Here’s what nobody tells you about WordPress optimization: most guides assume you have a web developer on speed dial and hours to spare.
I’ve been working with coaches and course creators who are juggling client calls, content creation, and business development – all while trying to figure out why their websites don’t show up in searches that are specific to their business.
Sound familiar? You know your expertise is valuable, but your website feels like it’s working against you instead of for you.
But here’s what I discovered after analyzing dozens of solopreneurs’ WordPress sites: the techniques that actually matter for small business owners aren’t the complex technical fixes everyone obsesses over.
While the ‘experts’ are drowning you in server configurations and advanced SEO tactics, let’s focus on the simple changes that actually help coaches and creators like you attract better clients – optimizations you can tackle in weekend afternoons, not weekend marathons.
Why SEO Matters for Your WordPress Site
Improved organic traffic translates into more client leads.
Beyond SERPs rankings and traffic, optimizing your site helps you:
- Build Trust and Authority: By delivering high-quality content and providing a great user experience, you position yourself as a reliable source of information. This established trust encourages visitors to seek your guidance and buy from you.
- Enhance Brand Awareness: A well-structured and easy-to-navigate website improves customer awareness and facilitates conversions. Because it helps visitors quickly understand your brand, expertise, and no services.
Prepare your WordPress site to compete for traffic and user engagement with the steps outlined below.
Choosing a Good-Quality Hosting Provider
A fast and reliable hosting can:
- Improve Page Loading Speeds: Google rewards websites with good Core Web Vitals, which measure factors like page loading speed. Since web hosting influences website speed, it directly impacts your website SEO.
- Minimize Downtime: Consistent uptime ensures your website is always accessible to visitors, preventing negative impacts on your SEO.
Choose a fast, reliable hosting service.
Some top hosting providers Include:
- HostGator: A highly-rated service I used for my former blog. It offers excellent technical support and reliable uptime.
- Bluehost, Hostinger, and DreamHost: Popular for their performance and ease of use; recommended by WordPress.
- SiteGround: Another top-rated hosting provider with a 4.8-star rating on Trustpilot.
- Namecheap: An affordable web hosting option offering great value for the price.
All these providers are compatible with WordPress, offer reliable uptime, and include free SSL certificates.
Selecting an SEO-Friendly WordPress Theme
Lightweight themes are suitable for consultants and solopreneur website. They have simple codes, offer fast page loading times, and great responsiveness.
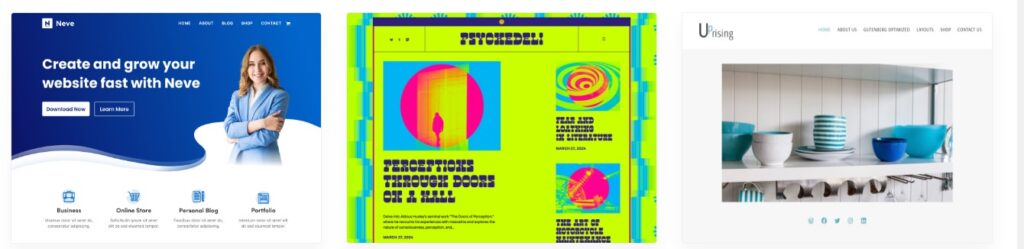
Here are some highly rated free WordPress themes:
- Neve: A clean, fast, and beginner-friendly theme I’ve used.
- GeneratePress and Astra: Known for their speed and simplicity.
- OceanWP, Kadence, and Blocksy: Feature-rich themes popular among SEOs and bloggers.
While the free versions of these themes are sufficient for most small businesses, upgrading to premium versions provides extensions and additional sites.
Ensuring Your Website is Indexable
When Google indexes your website, it adds your site’s information to its database, making your pages eligible to appear in search engine results.
To be sure your website is indexable:
- Go to your WordPress dashboard.
- Navigate to Settings → Reading.
- Confirm that the “Discourage search engines from indexing this site” box is unchecked.
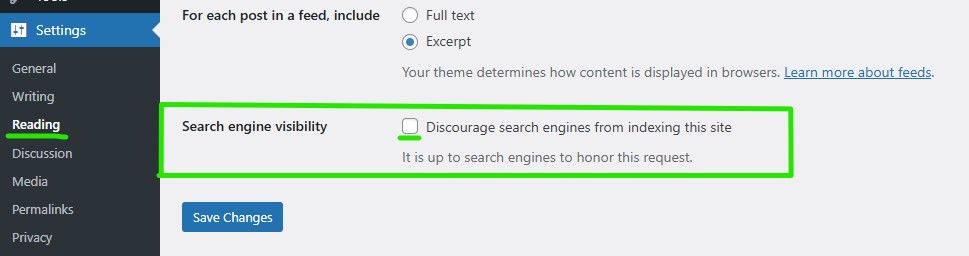
You can check this box at any time to hide your website from public view while making updates or changes.
Securing Your Website
Website security impacts SEO in two primary ways:
- Page Experience: Google’s core ranking systems prioritize pages that offer a positive user experience. A secure browsing environment signals safety to visitors, which contributes to good user experience.
- Overall Website Security: A hacked website can result in penalties, lower rankings, or even blacklisting by Google (removing it from search results entirely). Security issues can also prevent users and search engines from accessing your site, causing indexing problems.
Basic Security for our WordPress website:
1. Use strong passwords for your WP-Admin.
2. Update your site:
Go to Updates in your dashboard. In the window that opens, you can update your themes and plugins with a single click.

3. Create backups regularly:
In the case of a hack, you can restore your website from a backup file.
UpdraftPlus is a WordPress backup plugin that automatically creates backup files of your website and helps you restore them in three clicks.
4. Use WordPress security plugins such as:
Encrypting Your Site With SSL/HTTPS
SSL (Secure Sockets Layer) is a security protocol that encrypts information between your website and a visitor’s browser.
Though a minor one, HTTPS is a Google ranking factor. Securing your site with an SSL certificate signals to Google that you are creating a secure search experience for visitors.
Installing an SSL Certificate
Most hosting providers offer free SSL certificates and activate them by default.
If your website URL shows HTTP instead of HTTPS in the browser address bar, it means an SSL certificate is not installed. Install one by yourself using the Really Simple SSL plugin. This plugin automatically installs a free SSL certificate and configures your site to use HTTPS.
For step-by-step instructions on installing an SSL certificate with the different hosting providers, refer to this guide on the plugin’s website.
Improving Page Speed
Page speed measures how fast the content of a page loads after a user arrives on it. Page speed is a Google ranking factor.
Here are some insights about WordPress page speed, pulled from this WordPress.org tutorial:
- Around 40% of visitors abandon a website that takes more than three seconds to load.
- A one-second delay in page response can result in a 7% reduction in conversions.
Tools for Page Speed:
How to Improve Page Speed:
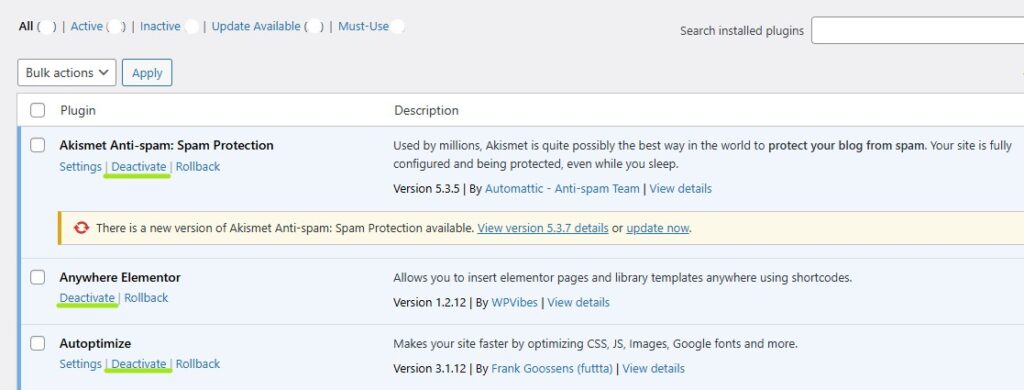
- Remove unnecessary plugins. Aim to keep your plugins to a minimum. To remove unwanted plugins: Go to Plugins in the side menu of your WordPress dashboard. Clicking Deactivate will reveal the Delete button. Then, click Delete to remove the plugin from your site.
- Optimize content and images; compress images into JPG or JPEG formats.
- Use a hosting service with a CDN. A CDN (Content Delivery Network) reduces loading time by storing your site content on servers at different geographical locations so that it is served from the database closest to a site visitor.
- Minify your code:
Minimize the size of your JavaScript and CSS files. Autoptimize is a popular plugin that you can use for this.
- Use a Caching plugin:
A caching plugin will store your site’s content after a user’s first visit so the content is served faster on future visits. The recommended plugins for this are W3 Total Cache and WP Super Cache.
Choosing Your Website URL Format
There are two website URL formats:
- www (http://www.example.com)
- non-www (http://example.com)
Search engines consider the two URLs to be different websites, which can create a problem of duplicate content. You can pick any URL format since neither has any SEO advantage. Only make sure you stick to that one.
To choose a URL option in your WordPress dashboard, go to Settings → General:

Input your preferred URL in both the WordPress Address and Site Address fields.
Using SEO-friendly URLs and Permalinks
The part of your URL just after the domain name is called the slug. It gives both search engines and readers an idea about the content of a page.
A plain permalink, the default URL structure, in WordPress looks like this:
Here’s a pretty SEO-friendly permalink:
https://etin-media.com/blog/wordpressseo
Not only are optimized permalinks informative, but they are also visually appealing and shareable.
How to create SEO-friendly URLs and permalinks:
- Pick a pretty option
The “Post name” structure is the best permalink format in WordPress. It includes the title of your post in the URL.
Head to Settings → Permalinks
Select “Post name”.
2. Include keywords
Having the target keywords in a URL helps both search engines and readers easily figure the content of a page.
Using WordPress SEO Plugins
A WordPress SEO plugin simplifies essential optimization tasks, such as image optimization, sitemap generation, and meta description creation.
The two most popular free WordPress SEO plugins are Yoast SEO and Rank Math. While Yoast has been around longer and has a larger user base, Rank Math receives higher ratings across multiple platforms:
- WordPress: Rank Math (4.9) vs. Yoast (4.8)
- Capterra: Rank Math (4.7) vs. Yoast (4.6)
- GetApp: Rank Math (4.7) vs. Yoast (4.6)
User feedback on Reddit also favors Rank Math over Yoast:
- 26 vs. 4 upvotes in one thread
- 16 vs. 6 upvotes in another
I personally loved using Yoast, but while writing this post, I switched to Rank Math. To be honest, I’m still exploring its features and haven’t decided if it’s truly better.
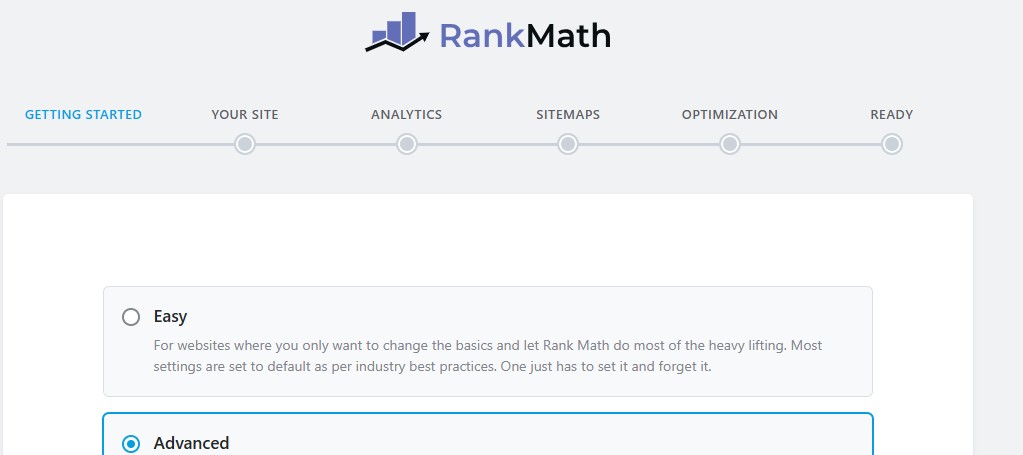
That said, Rank Math makes it incredibly easy to get started with optimizing your site. The Setup Wizard guides you through the process step by step, ensuring your SEO settings are configured correctly from the start.
Creating and Submitting XML Sitemaps
An XML sitemap is a file of code that lists all the pages of your website. It provides search engines with a roadmap of your website’s structure and content.
Submitting your sitemap to search engines helps them to efficiently crawl and index your site.
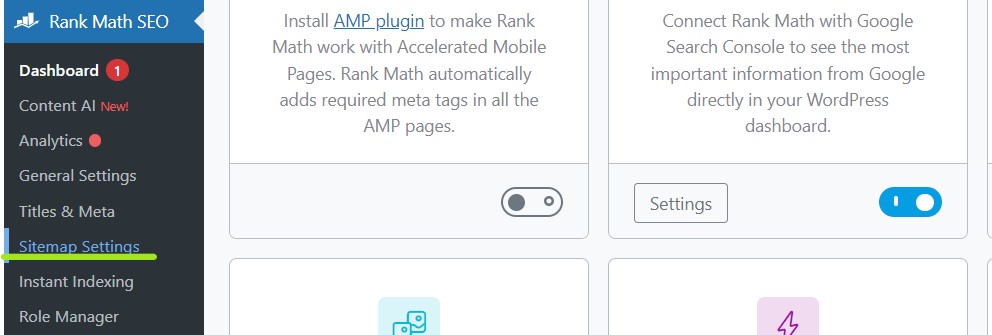
RankMath automatically generates a sitemap with basic settings upon activation. You can adjust the sitemap settings from your WP admin dashboard either under Rank Math SEO or through the Setup Wizard in the window.
Yoast also automatically generates a sitemap for you.
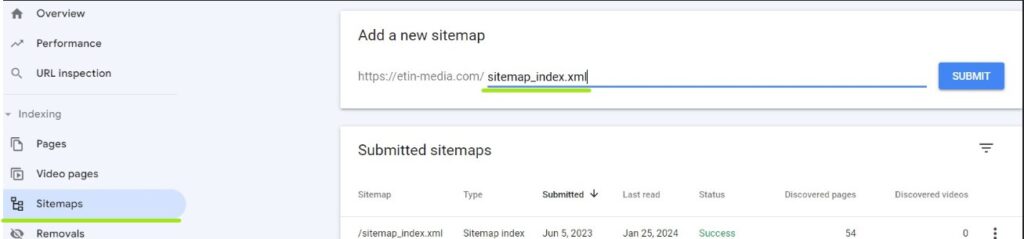
Submitting Your Sitemap to Google Search Console:
- Sign in to your Google Search Console account
- Click on Sitemaps in the side menu. Your domain URL ppp will be in the field on that form
- Add “sitemap_index.xml” to complete your sitemap URL
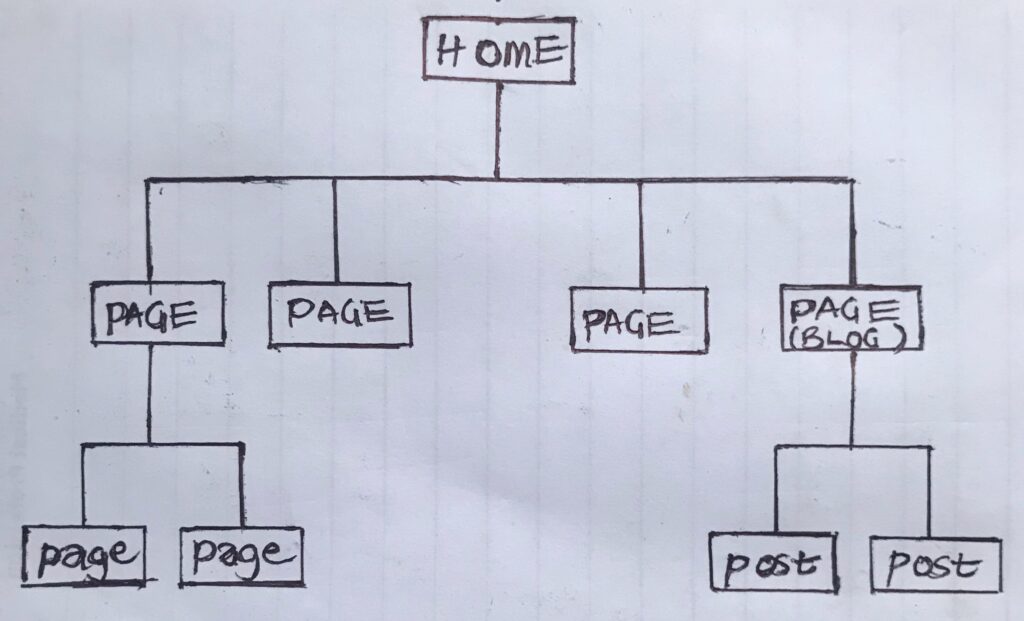
Plan Your Site Architecture
Create a hierarchical structure of pages for your site.
This means all the pages should be linked to the homepage in order of importance.
A good framework of pages makes it easier for search engines to crawl your site and for visitors to get around.
The goal is to reach each page in the fewest clicks possible from the homepage. Gael Breton of Authority Hacker says to aim for a maximum of three clicks.
Using Categories and Tags Strategically
Group posts of similar topics into categories. This creates a clean site structure and helps visitors and search engines navigate your site.
If you don’t assign a post to a category, WordPress will automatically group it as “Uncategorized”.
To add a post to a category:
Open the post editor. Click on the square icon at the top right corner of the page to access the settings panel:
In the panel, click on Post. Then, scroll down to the Categories section and check the box for the option that applies.
You can then select a category or create a new one.
Internal Linking
Internal links improve SEO by:
- Improving user experience: Internal links help visitors navigate your site. They also provide readers with more information and context on a topic by leading to related pages.
- Enabling search engines to access the interlinked pages on your site: This helps search engines understand and index the pages of your site.
Interlinking pages may also pass ranking ability authority from top pages to lower pages.
What you do is link from the best-performing pages to those pages with less visibility.
When search engines crawl the top pages, the links will lead them to the lower pages.
Adding Internal Links
In this LinkedIn post, Silvia Gutito shares a shortcut for finding internal link opportunities for an article:
- Get a phrase at the point where you want to add the link. Let’s say the phrase we want to link to is “WordPress plugins”
- Type the phrase in your browser search bar and add “:.website domain”. If the post were on this website, we have “WordPress plugins:.etin-media.com”.
- From the SERPs, pick the article that best fits the bill.
To add a link in WordPress:
- Select the anchor text.
- Click the link icon.
- Input a URL in the bar that opens.
Keyword Research and Usage
For keyword research, the objective is to discover and analyze the terms your target audience use when searching online. This information helps you develop a content plan tailored to their needs.
Keyword research is important for uncovering search intent —understanding what users want to find when they search for a term. So, you can create you can create relevant content that provides answers and solves their problems.
keyword research is vital for SEO and visibility. Google assesses a page’s relevance to a search query by looking for direct keyword matches or semantically related terms.
Keyword research also gives you the data you need to:
- Develop a strategic content plan.
- Generate content ideas.
- Assess your competition and identify opportunities.
An Overview of Keyword Research for Beginners:
- Identify the keywords your competitors rank for.
- Analyze and filter these terms using metrics like search volume, keyword difficulty, and search intent.
You need a good keyword research or SEO tool for this. Some of the best tools for finding keywords are:
- Semrush
- Ahrefs
- Google Keyword Planner
- Also Asked
Tips for keyword usage
- Use keywords in the content body
- Avoid keyword stuffing: don’t use keywords just to mimic search queries. Use them naturally and only where they add value.
- Optimize other aspects of your page such as H1s, meta descriptions, and page URLs.
Create Content
Content is at the center of SEO. Google prioritizes helpful, reliable content that provides real value to users. High-quality content not only drives discoverability but also guides users toward conversion by helping them understand how your services solve their problems.
How to Create Valuable Content
Creating valuable content starts with understanding your audience’s pain points and creating content that addresses them.
Match content to search intent. Thus, when visitors arrive on your page, they find answers to their search query. However, simply matching search intent is not enough. Make sure your content has enough depth to fully satisfy the user intent, otherwise, visitors will leave without engaging further.
Also, present your ideas in a way that is clear, easy to read, and engaging for your audience.
Focusing on User Page Experience:
- Content Clarity:
- Use headings, bullet points, and visuals to enhance readability.
- Page Design:
- Optimize for mobile responsiveness, fast page loading, and intuitive navigation.
- Accessibility:
- Use clear and bold text fonts and images. Add alt texts for images.
Demonstrating E-E-A-T
EEAT is not a ranking system but a rater guideline that signals that content may be high quality. These guidelines are especially used to prioritize content in the health and finance niches.
- Experience: Show that your content creators have first-hand knowledge of the topic by sharing personal examples and explaining the process behind their claims.
- Expertise: Use insights from original research, cite reputable sources, and include author credentials.
- Authority: Publish high-quality content. Gain backlinks and references from reputable sites in your industry.
- Trust: Include author bios and provide clear contact information. Make your website look clean and secure. Post factual information and avoid baity content.
Using Schema Markup
Schema markup is a piece of code you add to your site’s HTML to help search engines understand the structure and type of content on a page.
Different types of content, such as a “recipe” or an “About Us” page, have distinct structures. Schema markup labels these content types, making it clear to search engines what each page is about.
Common Types of Schema Markup are:
- Article: Highlights the author, date, and headline.
- Product: Displays price, availability, and ratings.
- Event: Shows event dates, locations, and times.
- FAQs: Presents questions and answers directly in search results.
Adding schema markup to your content can make it appear as rich snippets in search results, enhancing visibility and increasing click-through rates.
Adding Schema in Rank Math
When you activate the Rank Math plugin, the schema function is automatically turned on.
Since it’s important for every page on your website to have a schema, choose a default schema type to be applied to every post and page.
For posts:
In your dashboard, Go to Rank Math SEO → Titles and Meta:
Using the menu at the left tab on the new page, go to Post Types: Post→ Schema Type.
Choose Article, if your posts are going to be blog-type posts, and Save changes.
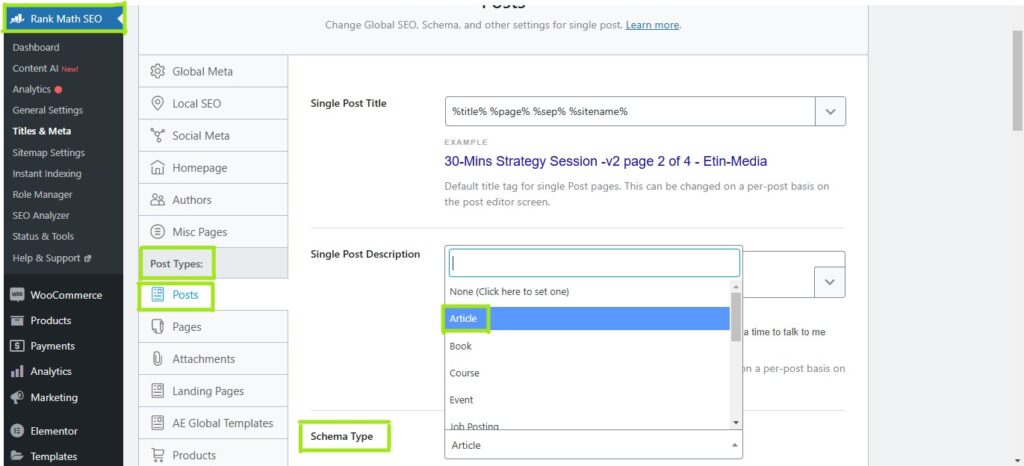
Repeat the process for pages.
You can edit options for your article schema, or choose a different type of schema under individual posts.
Editing the Article Schema
In your WordPress post editor, go to the Rank Math Icon which is that box that displays the SEO score at the top right-hand corner. Click on the schema icon (the third icon displayed there).
The default schema is Article type. You can either delete it and apply a new schema or add other schema types. Clicking on the editing icon in the Article tab will open up the schema builder window where you can set up the headline, SEO description, and keywords.
Click on the Schema Generator button to see the options for the schema that are available to you. You can choose any of the schema types, fill out the fields, and save your options.
Yoast also uses a similar intuitive method for adding schema to your site.
Image optimization
The text around an image on a page helps search engines understand its context. This could be nearby page content, filename, alt text, or caption.
Optimizing images with relevant text improves SEO and increases the chances of your images appearing in Google search results.
Tips for Optimizing Images
Quality:
Use clear, good-quality images
Filename:
The filename gives Google a hint of what an image is about. Use descriptive filenames, instead of auto-generated ones. For example, “pink car in a garage .jpg”, instead of “image002.jpg”.
Title:
I use the same terms for filenames and titles because WordPress automatically inputs the filename as the image title.
Alt Text:
An alt text is a description of an image. It improves user experience by providing context when the image cannot be displayed.
It helps visually impaired users by allowing screen readers to describe the image. It also appears in place of the image if it fails to load.
Good alt text clearly answers the question: “What does this image say?”
Best practices for alt texts:
- Use keywords where they add to the description. Repetitive and annoying keyword usage defeats the purpose of the alt text in the first place – good user experience.
- If an image contains essential words, include them in the alt text. So the alt text serves the same purpose as the image.
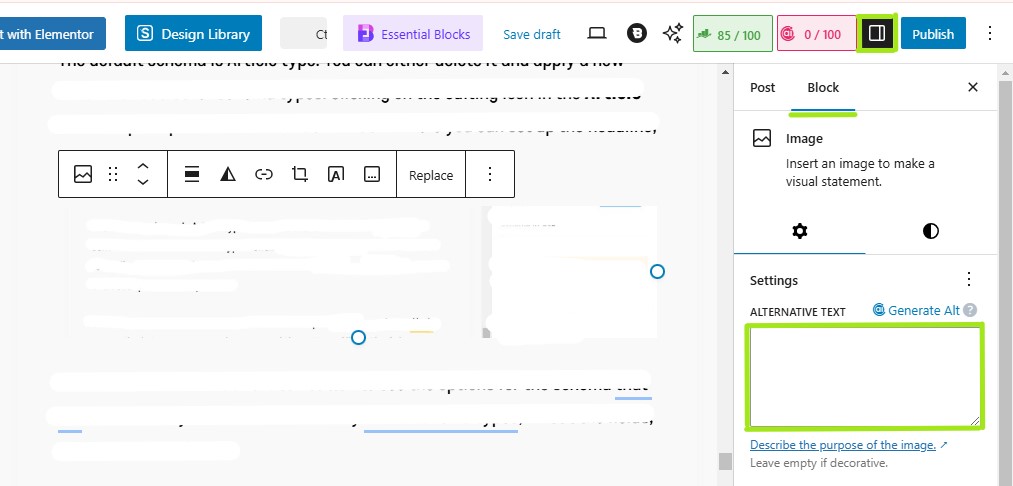
Adding alt texts in WordPress:
When you upload an image to the WordPress Media Library you can add a description in the Alt Text field.
Locate the Alt Text field and enter your description. Or, you can add it in the post editor in these steps:
- Click on the image block.
- Open the settings panel on the right side of the page by clicking the small box icon in the top menu.
- Select Block to reveal image editing options.
- Enter your alt text in the designated field.
Headings
Headings give context to the content underneath them.
An H1 heading tells what the overall page is about. While H2s, and H3s… are used to break up content into sections and also to give context about those sections.
Headings are rather weak ranking factors. Instead, focus on using them to facilitate user experience.
Headings are important for readers because they:
- Provide readers with the context of a page
- Help visitors quickly scan a page
- break up text into subsections, improving readability.
They also help search engines:
- understand the topic/context on a page
- Understand the structure of the content on a page
Writing Proper Headings:
- Avoid lengthiness
- Use a hierarchical order: H1→H2→H3
- Follow the same stylization
Using Keywords in headings:
Back when headings were ranking factors people would force keywords into headings to manipulate search engines.
Now, you don’t need to do any of that. Just add keywords where they naturally fit in headings.
Writing Meta descriptions
A meta description gives the summary of a web page in search results.
They help search engines understand what a web page is about. Meta-descriptions also give users a preview of the content of the page, improving click-through-rate.
Tips for writing meta descriptions:
- Keep it under 155 characters, Anything longer than that is cut short in Google SERPs.
- Summarize the page but be specific
- Use keywords where they naturally fit.
How to Add Meta Descriptions in Rank Math
In the post editor, go to the Rank Math settings for the post and click Edit Snippet to open the snippet editor. Locate the Description field and enter your meta description. Use the progress bar to keep the description within the ideal length.
This process is similar to adding a meta description in Yoast SEO.
Moderate comments
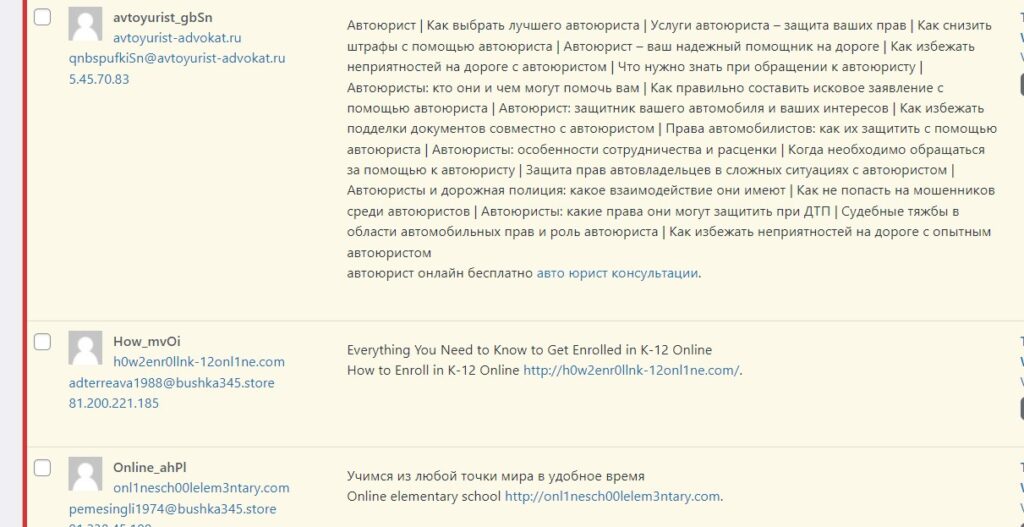
We get comment requests like these all the time. They are from spammers who try to get traffic to their shady sites through accidental clicks from unsuspecting visitors.
These types of comments make your site look suspicious, disorganized, and of low quality.
You can moderate comments by:
- Manually approving comments
In your WP dashboard, head over to Settings ➡ Discussion. In the window that opens, check comment must be manually approved.
- Using Plugins
- Askimet is an anti-spam plugin that comes pre-installed on every WordPress site. Other security plugins that you use to block spam comments are Sucuri, Firewall by CleanTalk, All-In-One Security and Firewall.
Optimize Your Website for Organic Lead Generation
By following the steps above, you can optimize your WordPress site to attract leads organically. While SEO takes time to deliver results, the long-term benefits are worth the investment.
If you’re looking for immediate results, consider supplementing your strategy with paid advertising.
Need expert help with client acquisition? We specialize in lead generation. Reach out to us at hello@etin-media.com.
For more guidance on capturing and converting leads, check out our blog post on the best WordPress plugins for lead generation.